Getting Started with Cyclr
A Comprehensive Guide for New Users
Welcome to Cyclr!
We’ve put together a comprehensive guide of all things Cyclr, with links to our resources on everything you need to know. Whether you’re new to iPaaS or Cyclr itself, this article will walk you through the basic concepts, helping you get started with the Cyclr platform in no time.
Let’s walk through the essentials, so you can make the most out of our tools and platform.
Resources:
- In-App Tutorials: Learn how to use Cyclr with step-by-step tutorial flows inside the console.
- Cyclr Documentation: We have detailed documentation available on all aspects of the platform.
- Community Site: Dedicated space for Cyclr users with exclusive content, tutorials and forum.
- Community Forum: Connect with other users, ask questions and share best practices.
- Video Tutorials: Dive deeper into how to get the most out of the platform with video courses available on our Community Site.
- How to sign up to the Community Site
- Help Center: If you feel stuck at any point, please don’t hesitate to reach out to our top-tier support team.
What is Cyclr?
Cyclr is an embedded Integration Platform as a Service (iPaaS) that allows you to build integrations and automations between different applications quickly and with ease. Our platform provides you with a wide range of tools to help you create, manage and publish in-app integrations.
Cyclr is designed to help businesses integrate and automate various apps and services, without necessarily needing deep technical skills. The platform empowers both developers and non-developers (also known as citizen integrators) to create, manage, and deploy integrations inside your own software product.
The Key Concepts

Before diving in, let’s get you familiarized with some of Cyclr’s key concepts. Click on the titles below to learn more about them.
Console
The Cyclr Console is your control panel where you can build and manage all of your templates and accounts, and where you can view and access reporting information.
For more information, you can visit the section on Console configuration in the Cyclr documentation.
Account
In Cyclr, your customers or end-users are referred to as accounts. The account structure allows you to keep each customer’s data and integrations separate and secure. With accounts, you can manage your customers’ integrations individually, ensuring each one gets exactly what they need.
Connectors
Connectors are the building blocks of your integration templates. They serve as the links between different applications and services, allowing data to flow between them.
There are two main types of connectors in Cyclr: Application Connectors and Utility Connectors. You can combine application and utility connectors, along with additional integration tools, to create your integration templates and cycles.
Application Connectors
Application connectors in Cyclr give you access to third-party applications. Each connector offers a range of methods that allow you to connect with the API to create integrations. There are over 600 Connectors available in the Application Connector Library.
If there is an application that you cannot find in our connector library, at certain price plans there is an option to create a custom connector. A Custom Connector is a connector that you can make within Cyclr to connect with an application of your choice.
Utility Connectors
To increase the amount of control you have over how your cycle processes data, you can combine application connectors with Utility Connectors.
In Cyclr, there are over a dozen Utility Connectors available for you to download and use in your workflows. Each Utility connector includes a range of steps that you can use in your integration templates to add advanced functionality features, such as storage, data validation, or file creation.
The Builder
The Builder is Cyclr’s visual interface for creating and editing cycles and templates. It provides a central canvas where you can drag and drop steps (actions and triggers) to create a workflow. You can connect steps, add logic, and configure advanced options all within the Builder.
The Builder also includes several tools and connectivity features to enhance your integrations, giving you greater control over how data flows in your integrations and between systems.
Templates
Templates are reusable integrations. They are definitions of Cycles that you can create and add to any number of accounts. Once you’ve built a Cycle, you can save it as a template and reuse it across different customer accounts. You can read further on templates in our documentation.
Cycles
Cycles are integration workflows that run in an Account. You can build custom Cycles for a specific customer in an Account, or create a Template that can be used for and installed on multiple customers Accounts. For more information on Cycles, see the Template introduction page.
There are some other important terminology that you will encounter in the Cyclr platform. You can find them and their definitions in our Glossary.

Building Integrations
The process of building integrations (templates or cycles) in Cyclr is straightforward, but varies slightly depending on what you want to do and with which connectors. To help you get started, here’s a general approach to building your first workflow in Cyclr.
For a more detailed run through, we also have a full video course with working examples available in the tutorials section of the Community Site. Signing up is free, and can be done easily on the Console. See the steps on how to sign up on the Community Site.
Step 1: Install Connectors
- Before you can build templates or cycles, you need to install a connector. In the Cyclr Console, navigate to the Application Connectors section.
- Search for and select the connectors that represent the applications you want to integrate (e.g. Salesforce, Mailchimp, Google Sheets, etc.).
- Start the installation process by clicking on the three dots, and selecting “Install Connector”. We have guides available for the full installation process for most of our connectors in the connector guides section of our documentation pages.
Step 2: Set Up the Workflow
- To start building your first template, access the Template Library and select the Create a New Template button. Or, you can start directly from your Console Dashboard by clicking the Design New Template button. You will be prompted to give your template a name, after which you will be swept away to the Builder.
- In the Builder, use the drag-and-drop interface to build out your workflow.
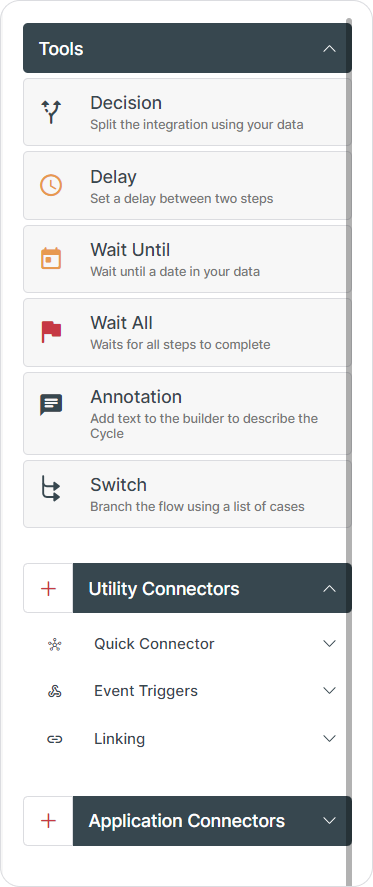
You can find all your installed connectors, as well as some readily available tools in the right-hand side panel in the Builder. Simply click on your desired connector or tool to see its available methods, and drag them to your canvas as steps.
There are three sections in the panel:- Tools: Selection of general tools that help add logic and functionality to your workflows. They are not connected to any particular connector and can be used at almost any point in your cycles.
- Utility Connectors: You will find three tools already available in the Builder (a.k.a. Connectivity Tools), but you can install more if you need to.
- Application Connectors: Here you will see a list of your installed application connectors.
If you need to install more utility or application connectors whilst inside the Builder, you can easily do so by clicking on the + buttons. You will find one next to both the Utility Connectors and Application Connectors sections. Clicking on it will take you to the connector library where you can search and install your desired connectors.
- Set up and connect your steps together. After you have dragged your steps onto your canvas (a workflow requires at least two steps), you can connect them. To do this, click on the exit (the dot on the right side) of one step and drag it to the input (dot on the left side) of another step you want to link it to. That’s how easy it is.
You can then add field mapping to your steps by accessing the settings button on each step to configure them. - Once you’ve built your workflow, it’s important to test it to make sure it works as expected. Testing helps ensure that everything runs smoothly. Read more on error handling in our documentation.
Step 3: Publish Your Template
- Once your template or cycle is fully tested and ready to go, you can publish it so that your customers can access the integration. Click on the Publish button at the top of the canvas, and select Integration published.
- Next, you need to promote your template draft to live. Cyclr provides full versioning of your templates so that you can iterate and update them over time. You can use these versions to track and revert changes if you need to.
To find your releases, click the Releases button on the right corner of the Builder canvas. You will be taken to the Template Releases page, where you can finally promote your release to live.

Account Management
Accounts help you manage multiple customers from within your Partner Console while keeping their data separate and secure. Accounts in Cyclr are invisible to your end-users, but the account structure allows you to manage their integrations more easily.
Sub Accounts
You can create Sub Accounts under a main account to further organize customer data. Sub Accounts are useful for businesses with multiple branches or teams, where each can have its own set of integrations while inheriting connectors from the main account.
User Management
Cyclr allows you to assign Users to specific accounts, granting them different levels of access. Admin users can manage integrations and invite others, while standard users can create and manage their own workflows within the assigned account.
You can read more about Account Structuring best practices on our Community Site.
Reports & Analytics
Cyclr also gives you visibility into how your workflows are performing. This allows you to keep an eye on your templates and accounts once they are all set up and running.
With a comprehensive suite of reporting tools that are available to you in the Console, you can monitor your usage, track active Cycles and Connectors, and see which Accounts need your attention. This helps you identify any issues early and ensure that your integrations are running smoothly.

Embedding Cyclr
Cyclr offers different embedding options that allow you to provide seamless integration experiences within your own application, depending on your use case and development resources. Embedding enables you to offer a cohesive, branded experience for your customers.
For further information, you can visit our documentation pages. We have specialized pages for all the main ways of embedding Cyclr in your product, and more.
If you are interested in embedding, please get in touch with your Cyclr representative to discuss your options further.

Support and Resources
Cyclr makes integrating and automating workflows simple, and you’re now equipped with the basics to start building integrations for you and your customers.
There are also many tutorials available in-app, to help you get better acquainted with the platform.
Once you’ve logged in, you’ll see a ‘Resources‘ button appear at the top of the console. There you can find a comprehensive selection different Cyclr resources, from in-app tutorial flows that will take you through the most important processes in detail, to important links to documentation, support. You can also get instant support from our AI support chatbot – Cypher.

As you explore the platform, if you need any further support, please don’t hesitate to get in touch, or explore our Community Site and documentation pages. We offer extensive resources and support to help you get the most out of the platform.
We’re here to support you at every step of your integration journey!