Introduction
This Connector Guide relates to the following Connectors:
- Microsoft Office 365
- Microsoft Office 365 (Application Permissions)
To use either of these Connectors, sign up for an application with Microsoft first and obtain the following authentication values:
- OAuth Client ID
- Client Secret
Create an Azure Active Directory OAuth application
For more information, see the official documentation for creating an Azure Active Directory application.
To summarize the above documentation:
- Either log into your existing Azure account or register for a free Azure account.
- In your Microsoft Azure portal, go to Azure Active Directory > App Registrations > New application registration.
- Provide the following details:
- Name: Your Application Name
- Reply URLs: set this to your Cyclr Partner Console’s Callback URL.
- Multi-tenanted: Yes
- Set the appropriate permissions.
Note: Ensure the refresh token expiry time is over 30 days as the OAuth authentication refreshes automatically every 29 days.
Set Permissions
You need to set different permissions in Azure Active Directory depending on which methods you wish to use in your integrations.
You must also set the Type of each Permission differently depending on which Cyclr Connector you use:
- Microsoft Office 365: set permissions as Delegated.
- Microsoft Office 365 (Application Permissions): set permissions as Application.
Within your Azure Active Directory, from the Application view Manage on the left side of the page, navigate to API Permissions.
Add the following permissions:
| Method Category | Permission Name |
|---|---|
| Users | User.Read.All |
| User.ReadWrite.All | |
| Directory.Read.All | |
| Directory.ReadWrite.All | |
| Calendars/Calendar Groups/Events | Calendars.Read |
| Calendars.Read.Shared | |
| Calendars.ReadWrite | |
| Calendars.ReadWrite.Shared | |
| Emails | Mail.Read |
| Mail.Read.Shared | |
| Mail.ReadWrite | |
| Mail.ReadWrite.Shared | |
| OneDrive | File.Read |
| File.Read.All | |
| File.ReadWrite | |
| File.ReadWrite.All |
Note: For each permission, the type is either Delegated or Application dependent on the Cyclr Connector you are using. For more information, see the Microsoft documentation on permissions.
Cyclr Setup
To set up the Microsoft Office 365 connector in Cyclr, go to your Cyclr console:
- Go to Connectors > Application Connector Library.
- Use the search box to find the Microsoft Office 365 connector.
- Select the Setup Required icon.
- Enter the below values:
| Property | Description |
|---|---|
| Client ID | The Application ID from your Microsoft Azure portal. |
| Client Secret | The password from your Microsoft Azure portal. |
- Select Save Changes.
Note: If you leave any values blank, Cyclr asks for the value when you install the connector into an account. This means you can use different settings for different accounts.
Account Setup
Depending on which version of the Microsoft Office 365 Connector you’re installing, there are different options:
Microsoft Office 365
When installing the Microsoft Office 365 Connector (not the “Application Permissions” version), you’ll see two authorization options:
- Common: the connector allows you to use work or organization accounts, and personal Microsoft accounts, during authentication.
- Organization: the connector only allows you to use work or organization accounts during authentication.
Microsoft Office 365 (Application Permissions)
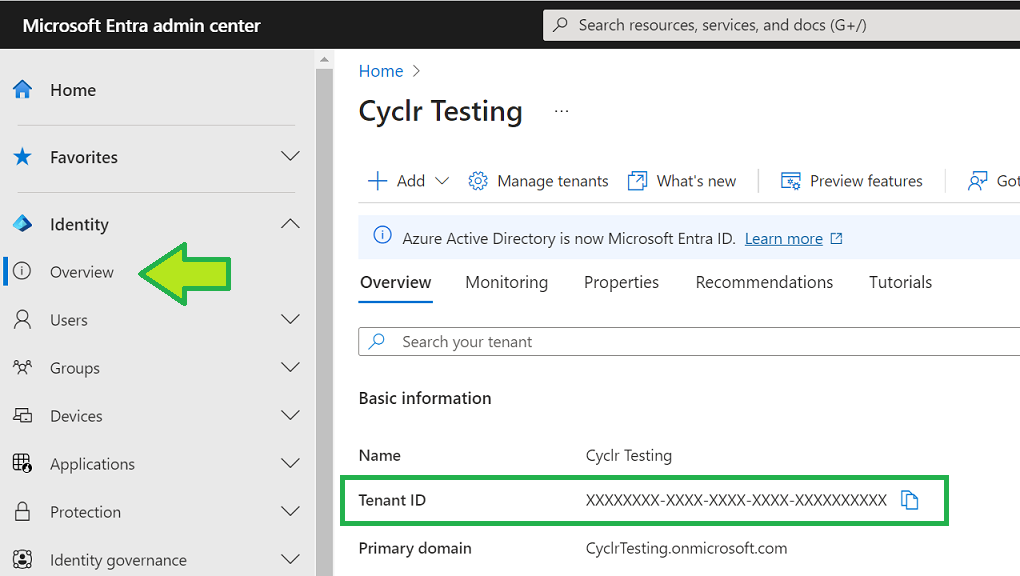
When installing the Microsoft Office 365 (Application Permissions) Connector you’ll need the Tenant ID of the Microsoft account to work against.
The Tenant ID can be located as follows:
- sign in to the account’s Microsoft Entra admin center (formerly Azure Active Directory): https://entra.microsoft.com/
- on the left side, go to Identity > Overview.
- Scroll down to Tenant ID.