Due to Pipedrive’s OAuth 2.0 process, your customers need to follow the Pipedrive setup information and set up an application in Pipedrive themselves to obtain the authentication details.
If you don’t want your customers to need to set this up themselves, you can use the standard Pipedrive connector.
Requirements
Pipedrive uses OAuth 2.0 authentication for remote API access, so to connect with Cyclr, you need to create an application within Pipedrive.
To create an app, you need to request a developer sandbox account,
To obtain the authentication values, you need to register the application in the Pipedrive Developer Hub.
To connect with Cyclr, you need to set the correct callback and scopes in the App registration form:
- In the Callback URL field, enter your Cyclr Partner Console’s Callback URL.
- Enable the Access scopes as either Read only or Full access.
For more information, see the Pipedrive documentation on scopes.
Get authentication details
To connect with Cyclr, you need the following authentication values:
- Client ID
- Client Secret
To view the authentication details, open up the app in the Pipedrive Developer Hub. In the settings, go to the OAuth and Access Scopes tab to see the Client ID, and select Show to view the Client Secret.
Cyclr setup
To set up the Pipedrive OAuth 2.0 connector in Cyclr, go to your Cyclr console:
- Go to Connectors > Application Connector Library.
- Use the search box to find the Pipedrive OAuth 2.0 connector.
- Select the Setup Required icon.
- Enter the below values:ValueDescriptionClient IDThe Client ID from the Pipedrive application.Client SecretThe Client Secret from the Pipedrive application.Callback URLCyclr fills this field by default.
- Select Save Changes.
Note: If you leave any values blank, Cyclr asks for the value when you install the connector into an account. This means you can use different settings for different accounts.
Setup
Cyclr requires Pipedrive to use OAuth 2.0 authentication for remote API access. You must register Cyclr within Pipedrive as its own App to receive a Client ID and Client Secret. This enables Cyclr to authenticate and connect with Pipedrive.
Note: Due to how Pipedrive authentication works, customers themselves will need to follow the below Pipedrive setup process. You may wish to use the standard (non-OAuth) Pipedrive Connector if you don’t want your customer to have this responsibility. With the standard Connector only their personal API Key is required for installation. (https://support.pipedrive.com/en/article/how-can-i-find-my-personal-api-key )
Pipedrive integration building examples
Automate Pipedrive
Automating Deals
Our Pipedrive connector includes a number of webhooks. These are real-time event notifications that fire when something happens to a deal, e.g. when one is created or updated.
Example uses:
- Sync new deals with another system
- Trigger time-based actions for deals stuck at a certain stage
- At key deal stages, add the associated contacts to a marketing system
- Automate internal Pipedrive deals, e.g. when a deal hits a certain stage move it to a different pipeline
Deal stage lookups
One of the keys to using Pipedrive’s deals is working with the Stage ID in a Cyclr Decision step. In doing this, you can then trigger the next appropriate action – either in Pipedrive or in another app.
Forms
With Cyclr, you can integrate Pipedrive with a number of form building apps including:
- Contact Form 7
- Gravity Forms
- Typeform
- SurveyMonkey
Automate Your Sales Pipeline
Cyclr lets you automate your sales process by using webhooks and triggers based on movements between pipeline stages.
Example uses:
- Send deals to separate pipelines for other teams to complete work on
- Automatically assign reminders for yourself or team members based on deal stages
- Trigger external application events when a deal reaches a chosen stage
- Automatically send emails and messages when a deal hits a particular stage
Automation Implementation
Follow our below video guide to get you started with Pipedrive Automation.
Pipedrive Updates with Webhooks
Cyclr combined with Pipedrive’s webhook builder allows you to trigger automation workflows based on a wide range of actions in your CRM.
Our Webhook connect includes an automatic field discovery feature, helping you set up your automation workflows in no time.
Watch the video below to see how you can make use of Pipedrive’s webhooks.
Pipedrive and Contact Form 7 Integration
Getting Contact Form 7 to work with your Pipedrive CRM has been a pain for a long time, so you’ll be please to see that you can connect the two with Cyclr.
Why Integrate Contact Form 7 and Pipedrive?
Contact Form 7 is still one of the most popular form building applications around. While it’s name suggest it is just for contact forms, it has many usages when combined with Pipedrive, including:
- Adding new website enquiries directly into your CRM
- Creating new deals direct from forms
- Managing helpdesk enquiries
- Passing user registration data across your company’s application stack
Take a look at our video tutorial to find out how to get it set up.
Automatically Add New Users to your CRM
Cyclr lets you integrate Pipedrive with Intercom, so you can add and update user data within your CRM automatically.
Cyclr’s Intercom connector contains a range of webhooks that can be triggered when an event criteria in Intercom is met. Take a look at the video guide below to see how you can set it up.
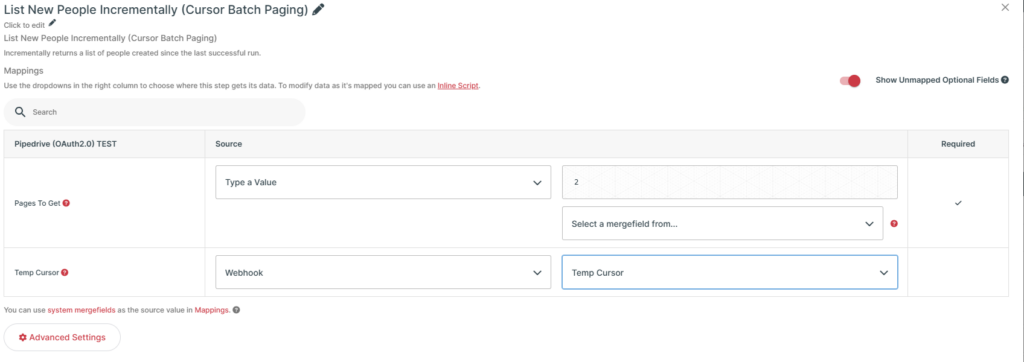
List New People Incrementally (Cursor Batch Paging)
The List New People Incrementally (Cursor Batch Paging) method is a type of pagination strategy designed to efficiently retrieve large datasets of people records in incremental batches, ensuring that each request only returns a set number of records per transaction.
Steps for Using Cursor Batch Paging
- Initial Request:
- Make the first request to retrieve the first batch of people created since the last successful run.
- Specify the number of pages (or records) you want to retrieve per transaction (e.g., 10, 50, 100 people).
- Response with Temp Cursor:
- The response will contain the list of people, and if there are more records available, a Temp Cursor will also be returned.
- This Temp Cursor is a pointer or reference that indicates the position in the data set where the next batch of records can be fetched from.
- Subsequent Requests:
- To retrieve the next batch of records, pass the Temp Cursor from the previous response into the next request.
- The system will use this cursor to fetch the next set of people records, continuing from where the previous request left off.
- Continue Paging:
- Repeat the process of making requests with the Temp Cursor and retrieving more records until there are no more records to retrieve (the Temp Cursor may be
nullor indicate that all records have been returned).
- Repeat the process of making requests with the Temp Cursor and retrieving more records until there are no more records to retrieve (the Temp Cursor may be
- Final Response:
- Once all records have been retrieved, the final response will not include a Temp Cursor because there are no further records to fetch.
In order to use List New People Incrementally (Cursor Batch Paging) method, the following implementation is necessary:
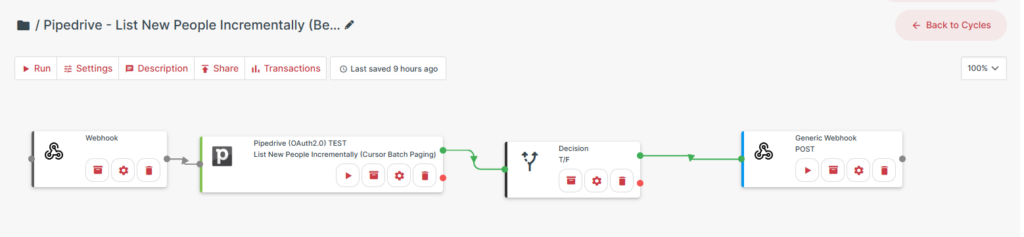
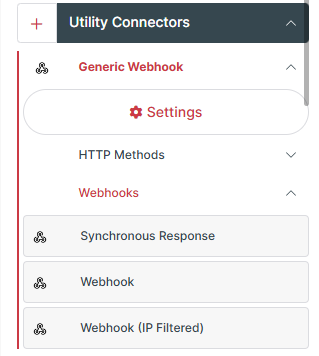
- Webhook:
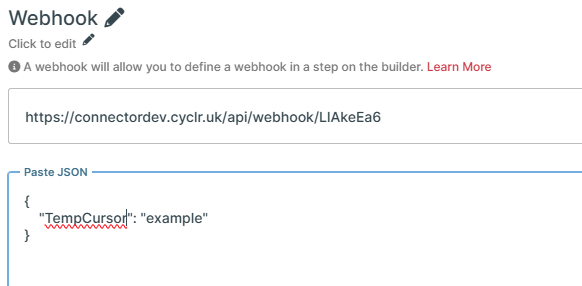
- From the Utility Connectors on the right hand side panel, click on Generic Webhook, then Webhooks and drag Webhook step into the canvas.
2. Click on the Webhook step’s Clog icon and add the JSON request that will hold the Temp Cursor, in our example it was named cf1
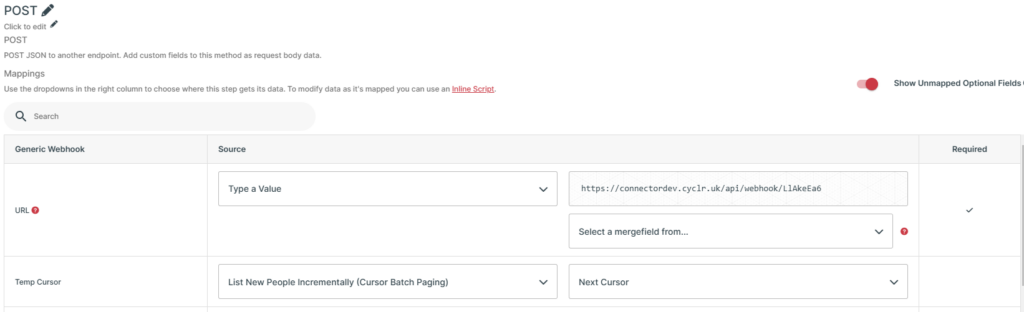
- List New People Incrementally (Cursor Batch Paging):
- Map List New People Incrementally (Cursor Batch Paging) Temp Cursor to Webhook Temp Cursor
- Decision step:
- Check that List New People Incrementally (Cursor Batch Paging) Temp Cursor exist

- Generic Webhook Post
- From the Utility Connectors on the right hand side panel, click on Generic Webhook, then HTTP Methods and drag POST step into the canvas.
- Map field URL and Temp Cursor