Note: Xero imposes a limit of 25 connections per OAuth App, unless your App has been certified.
You can read more about this limitation here:
https://developer.xero.com/documentation/guides/oauth2/tenants/#connections-and-limits
Further information on the certification process is here:
https://developer.xero.com/documentation/xero-app-store/app-partner-guides/certification-checkpoints/
Creating a Xero App
Go to https://developer.xero.com/myapps to create a Xero OAuth 2.0 App in Xero.
Click the New app button in the top right to see a form similar to this:
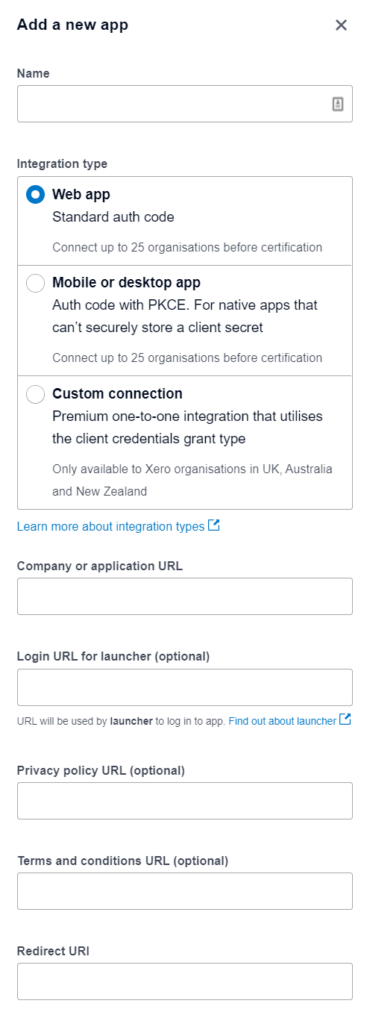
Give the App a name. This will be presented to your users when they are asked to provide consent so you may choose not to mention Cyclr.
Leave the Integration type as Web App and complete the rest of the fields.
Under Company or application URL, enter the domain of the site where your integration will be hosted.
For Redirect URI, enter your Cyclr Console’s Callback URL.
Read and agree to the Xero Developer Platform Terms and Conditions, and click Create App.
Obtaining your Client ID and Client Secret
You should now see an App details screen – select Configuration from the menu on the left.
Make a note of your Client ID.
Generate a Secret, and make a note of that too.
You should now take your Client ID and Client Secret values and store them in your Cyclr Console against the Xero (OAuth2.0) entry.
Cyclr Setup
If you are a Xero Partner, you can also provide your User-Agent string, othewise leave it blank.
You should now be able to successfully install a Xero (OAuth2.0) Connector.
Payroll Sections
Xero has separate APIs for the Australian, UK and New Zealand markets so the Cyclr Xero (OAuth2.0) Connector has different payroll Methods to support them.
You need to ensure that the client only uses the payroll section related to their Xero account. If the user’s system payroll is Australia they should only use the payroll methods under the Payroll – AU Section.
All other Method Categories are common to all markets.